![]()
This Tutorial is my own creation and belongs to me ©Kathy Butler.
Any resemblance to other Tutorials on line is purely a coincidence.
Do not upload to any website, share, re-write, script or translate
Any part of this tutorial and/or tutorial supplies without permission
From me.
Tutorial supplies and any other parts from my tutorials that are made
By me belong to me and may not be sold or re-distributed.
Please feel free to link to this tutorial.
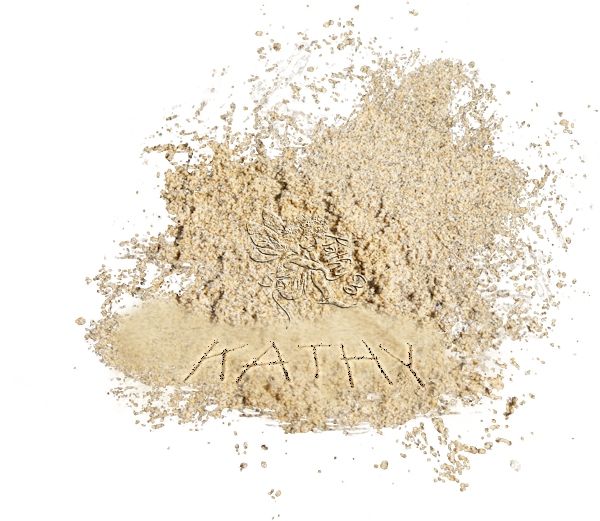
Having been asked several times how I did this effect, I decided to write a simple tutorial describing how I created the look of my name written in sand. The settings used would vary somewhat depending on the background being used. This is only one of, I am sure, many ways to create the same effect.
Supplies needed: Font of choice. I am using a font called Wallowhmk here (any narrow stick like font would work)
I have supplied some materials so you can follow along with the tutorial.
Materials: here
Sand pattern
Sand background
The image at the end of this tutorial was created using the artwork of Caron Vinson www.caronvinson.com
plus miscellaneous scrap pieces from various scrap kits.
Assuming you have a working knowledge of PSP, let's get started....
STEP 1
Open the supplied sand pattern and sand BG images in PSP
Minimize the sand pattern image.
Activate the sand BG image. Duplicate the sand BG image and close the original.
STEP 2
Activate the text tool with these settings:
Font: WallowHmk; size 36; Anti-Alias: Sharp; Stroke 0; create as a vector; FG NULL; BG supplied sand pattern at 100%
Type your Text and place it where you want it.
To give the text some perspective do the following:
Using the pick (deform) tool; hold down the CTRL key, , grab the bottom right node with your mouse and pull out to the right to make the bottom of the text wider.
Then, grab the upper right node and pull towards the left to make the upper part of the text look smaller.

Rename this layer Text 1
Change the Blend mode to Dissolve; Opacity to about 20
Leave as a Vector layer
STEP 3
Selections> From Vector Object
Selections> modify> Contract> Number of Pixels = 1
Right click on the layer; Promote Selection To Layer
Rename the promoted layer Text 2
Deselect.
STEP 4
Highlight Text 2 layer
Effects> drop Shadow
H & V = 0
Opacity = 100
Blur = 2
Color = Black
Shadow on new layer = Checked
On the Shadow Layer
Change the Blend Mode to Dissolve; Opacity to about 32
STEP 5
Highlight the Text 2 Layer
Change the Blend Mode to Multiply; Opacity to 57
Highlight Text 1 layer (Vector Layer)
Selections> From Vector Object
Highlight Text 2 layer
Layers> new Raster Layer
Highlight the new layer
Rename this Layer Text 3
Effects> Drop Shadow
H & V = 2
Opacity = 85
Blur = 6
Colour = White #ffffff
Shadow on new Layer NOT checked
Repeat Drop Shadow with H & V = (minus) -2
On the shadow layer, hit the Delete key about 2 X
Change the Layer Blend Mode to Luminance L
Opacity to between 85 and 100, whatever looks best to you
Deselect
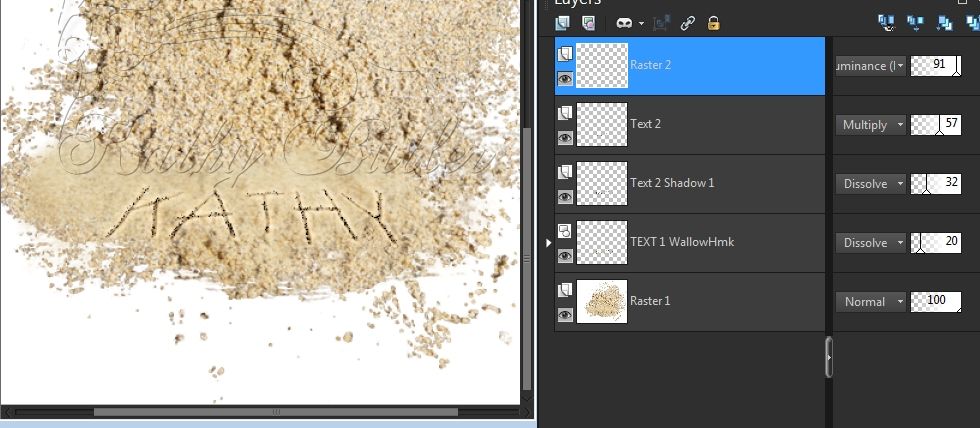
This is my layer line up and image view at this stage.
That is it, you are done !
I hope you enjoy using this technique on your own tags! Play around with the settings to get the look you want.

Kathy Butler – June 27, 2013
