TEXTERINA
This Tutorial is my own creation and belongs to me ©Kathy Butler.
Any resemblance to other Tutorials on line is purely a coincidence.
Do not upload to any website, share, re-write, script or translate
any part of this tutorial and/or tutorial supplies without permission from me.
Tutorial supplies and any other parts from my tutorials that are made by me
belong to me and may not be sold or redistributed.
Please feel free to link to this tutorial.
SUPPLIES NEEDED:
PSP any version should work.
Alien Skin Eye Candy 5: Impact (Optional)
Font of choice.
I am using a Font called Knurled Grips that you can get here
Tube of choice.
I am using the PTU "PinUp Toons" from CDO
License to use PinUp Toons can be purchased here
Please do not use the same image without a license.
SUPPLIES INCLUDED: Here
ballet shoes, rose petals, flowers, mask and sparkles, brush
NOTES:
Place the brush into your brush folder. If it does not show up in your PSP, it will be necessary
for you to Import the brush into your PSP program for later use
I did this tutorial using PSP X4 but it can easily be done in any version.
This tutorial is at a beginner to intermediate level but assumes you have
some knowledge of using PSP and filters.
Most important SAVE your work often. I will be reminding you to do
so as you go along :)
Let’s get started:
STEP 1
File, New, 800 X 800, transparent checked (we will resize later)
Flood fill tool, flood fill with white
Text tool:
Knurled Grips size 200; Anti-alias smooth, foreground #f6548d, Background #57bdd6, line style-small dash; line size 1.0;
create as: Vector
May have to play around with the size depending on your resolution.

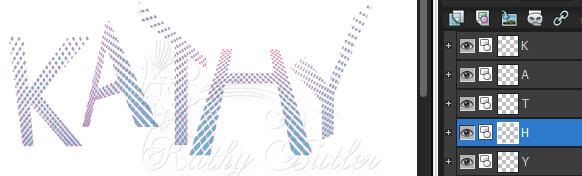
Click on your canvas and type each letter of your name on a separate vector layer.
Putting each letter on a separate layer is needed for doing the drop shadow later on.
Name each layer with the matching letter.
Keep layers as vectors for now.
SAVE.......
STEP 2
Move tool: (Instead of pick tool because it makes it easier to see what you are doing without bounding box)
Go to each layer one at a time and arrange (move) your letters to spell out your name (or whatever you are using).
Keep the layers as Vector while reshaping to keep them from losing quality.
Deform(pick) tool for PSPX++.
Highlight each of the letter layers one at a time. There will be a bounding box around the letter you are working on.
Pressing the CTRL or Shift keys while moving any of the nodes, twist, reshape, resize and/or rotate your letters to your liking.
This is what my letters and layers look like at this stage. Each letter remains on separate layer.
SAVE.....
STEP 3
If you are happy with what you see,
Highlight your first letter layer, right click, convert to raster
Repeat convert to raster for each letter layer
STEP 4
I will show you 2 ways to place the drop shadow. One using Eye Candy 5
and the other using the PSP drop shadow
A: Eye Candy Method
Highlight your first letter layer
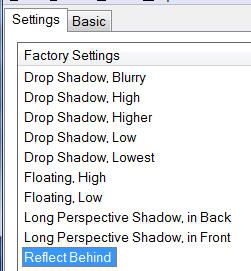
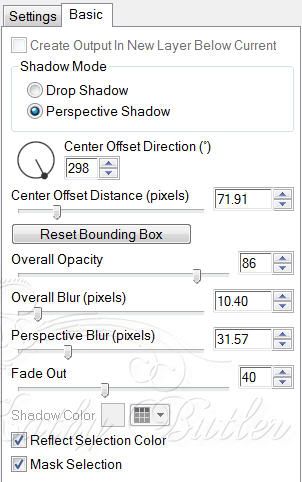
Effects; Alien Skin Eye Candy 5: Impact; Perspective Shadow
with these settings: Or settings that work best for your letters)
Click OK
This is what mine looks like

Repeat the same Eye Candy Perspective Shadow for each letter layer - adjusting as needed for each letter
B: PSP Drop shadow method
Highlight first letter layer
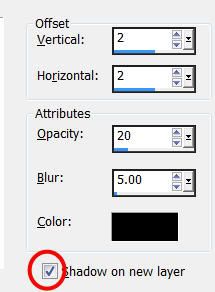
Effects; 3D Effects; Drop Shadow
H,V 2, Opacity 20, Blur 5, Colour Black #000000
Check in Shadow on new layer
Be sure you are on the letter shadow layer
Tools, deform (pick) tool
- Holding down the CTRL key, with your mouse, grab the upper right hand corner and pull to the right
to widen the top of the shadow
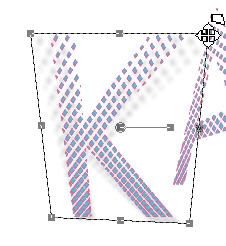
- release the CTRL key and grab the centre node and pull down a little more than half way
- Hold down the Shift key and grab the centre node again and drag to the right
to position where you want it
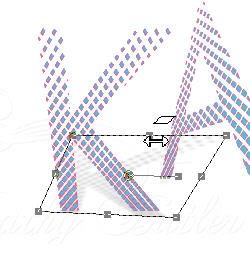
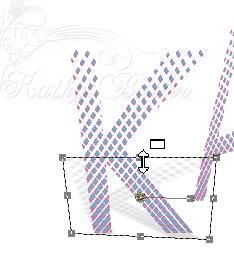
Repeat the above steps for each letter layer making sure the drop shadow is on it's own
layer for each.
Leave the layers as they are for now.
STEP 5
Copy and Paste your tube as a new layer and place it where you like.
I placed mine behind the letters.
Use the same drop shadow method on your tube that you used above.
If you are using the flowers and rose petals I supplied, it will be necessary to resize and colorize them
to suit your colour range. Scatter the flowers and petals around as you like.
Place the ballet shoes.
Drop shadow all the extra elements
H,V 2, Opacity 30, Blur 5, Colour black #000000
SAVE.....
STEP 6
Hide your white background layer 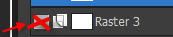
The background should now be transparent with only your completed letters, elements and tube showing
Selection tool, Rectangle, Mode Replace, Feather 0, check Anti-alias, Merged opaque (see screen shot)

The marquee will surround the opaque areas of the entire image.
Image; crop to selection
SAVE.....
STEP 7
Highlight the background layer
Layers; new rastor layer
Highlight the new layer
Tools; brush tool. I used the fuzzy brush in the supplies. Default settings. Change opacity to about 25
Foreground #f6548d, Background #57bdd6 (or your colour range)
Paint random blotches around the canvas using both colours from your palette. It is not necessary
to fill the entire canvas

Remain on the painted layer
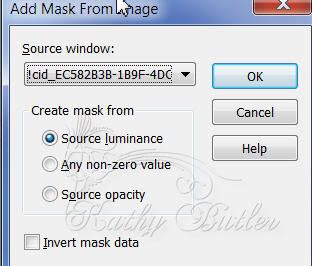
Open the supplied mask in PSP
Layers; New Mask Layer; From Image
In the Source window drop down box, select the mask
Check Source Luminance
All others unchecked.
Click OK
Layers; Merge; Merge Group
Adjust the opacity to your liking
STEP 8
Open the sparkles tube
Copy the sparkles image and paste on to your canvas as a new layer above the mask layer
Move Tool, move the sparkles to your liking
If necessary....
Image; Resize; Resize all layers checked (size to your liking)
SAVE....
I always duplicate at this point to save a copy with all the layers in place.
Window: Duplicate (Shift + D)
Close original working image
Layers; Merge; Merge Visible
Layers, New Raster Layer
Add your Watermark and the appropriate Copyright credits
Save your work as a JPEG or PNG (for transparent background) for using as you like.
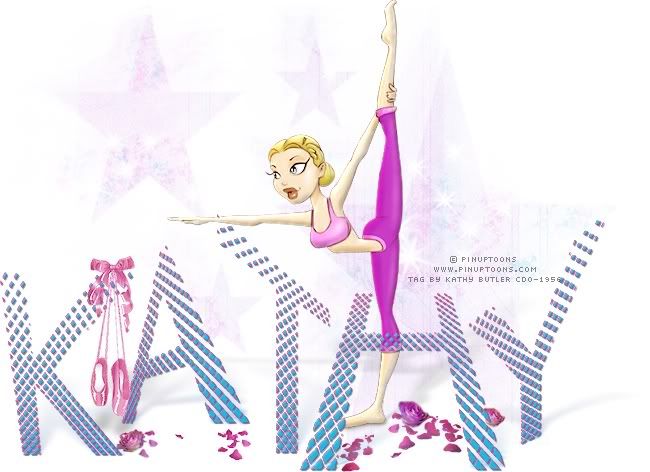
That's it... you're done :)
Hope you enjoyed working on this tutorial
I would love to read your comments and see your results...
http://kateysplace.weebly.com/
