

This Tutorial is my own creation and belongs to me ©Kathy Butler.
Any resemblance to other Tutorials on line is purely a coincidence.
Do not upload to any website, share, re-write, script or translate
Any part of this tutorial and/or tutorial supplies without permission
from me.
Tutorial supplies and any other parts from my tutorials that are made
by me belong to me and may not be sold or re-distributed.
Please feel free to link to this tutorial.
I am using the amazing FTU artwork of Barb Kermis. The tube I am using is supplied in the materials and is from Barb’s Spring collection.
Barb’s work can be found here.
If you use Barb's art, please be sure to give proper copyright credit as follows:
© Barb Kermis www.barbkermisdesigns.com
Plugins needed: here
dsb flux – Blast
AAA Frames: Photo Frame
Font I used: Monkey Wishes - here
All the other materials needed to complete this tutorial can be found: here.
NOTES:
I did this tutorial using PSP X5 but it can easily be done in any version.
This tutorial assumes you have
knowledge of working with PSP and Animation Shop.
Most important SAVE your work often. I will be reminding you to do
so as you go along :)
Let’s get started:
The main focus of this tutorial is to learn how to create the animation. The background is supplied in the template but feel free to use whatever background and elements you wish.
STEP 1
We are going to work on the animation part of the tutorial first.
Open the supplied Dandelion Spring Template.
Window; duplicate (Shift+D)
Close the original
Save
STEP 2
Delete the Credit layer. Close off all the layers. Open Background layer and ORIGINAL Layers only.
Highlight the ORIGINAL Layer
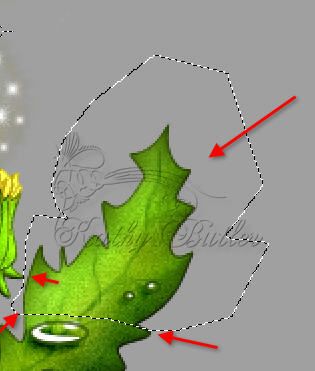
Freehand selection tool; Point to Point; Feather 1, Anti-alias checked.
Zoom in very close and with the Freehand Selection Tool, select just the mouse. Be careful not to include any of the leaf or flower.
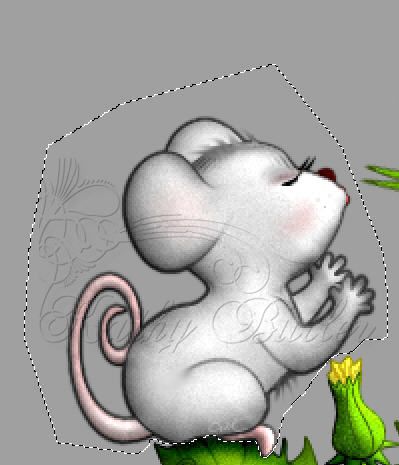
Right click on the Original layer and choose Promote Selection to Layer. Rename the Promoted layer to Mouse 1. Keep selected.
Highlight the Original layer. Hit your delete key.
Deselect.
Save
STEP 3
Freehand Selection Tool same settings as above. Select the parts of the flower that have blown off.
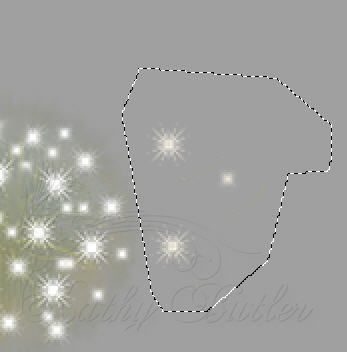
Right click on the Original layer; Promote Selection To Layer. Rename the Promoted layer to Flower 1
Highlight the Original layer. Hit your Delete key.
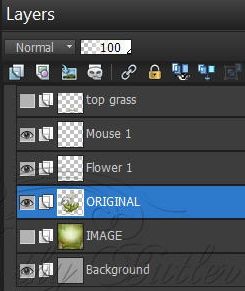
This is what my layer line-up looks like to this point.
Save
STEP 4
Highlight the Original layer again. We are going to rebuild the leaf part where we deleted the mouse so there will be no empty spaces when the mouse moves. I am using more leaf part than needed, but it allows more surface area to work with.
Hide the Mouse 1 and Flower 1 layers by putting an ‘X’ in the eye of each layer.
Still on the original layer.
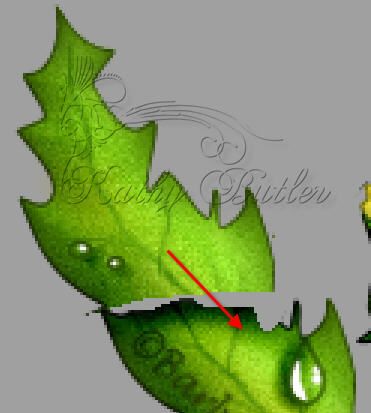
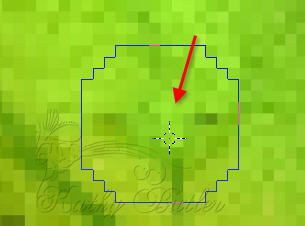
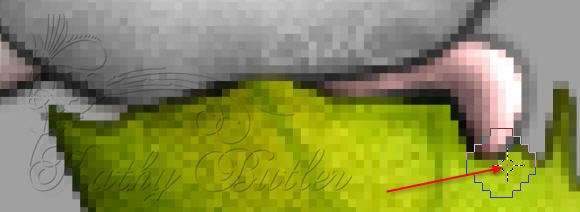
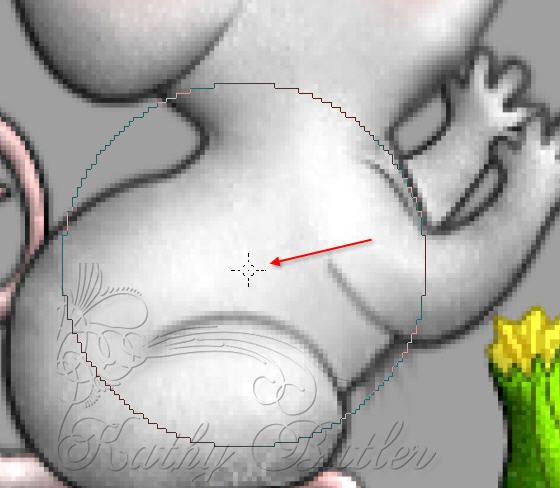
Freehand Selection tool; point to point; same settings. Select leaf section on the right as shown in the screenshot below.
Right click on the original layer; Promote Selection to Layer. Deselect.
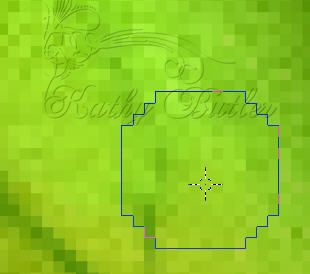
Highlight the Promoted Selection Layer; Image; Mirror.
Move tool; move the leaf into place to line up with the leaf below as in the screenshot below.
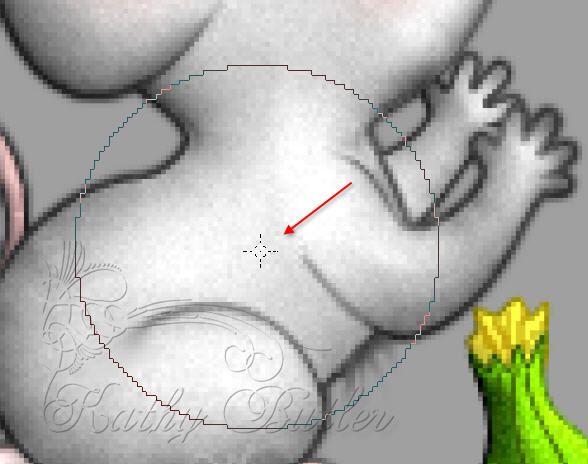
Still on the Promoted Selection Layer.
Warp Brush; push; size 20; hardness 50; strength 100; Step 25. The rest of the settings stay at default.


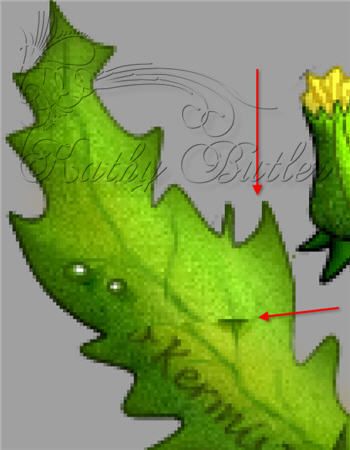
Touching the bottom of the leaf at the vein with your cursor, gently move the leaf to the left to line it up with the bottom leaf. Click APPLY

STEP 5
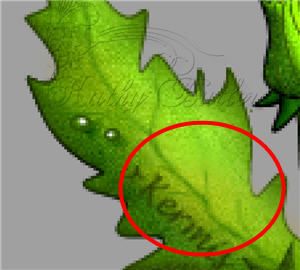
Let’s fix the part of the leaf that is not blending in too well.
Clone tool; size 10; Hardness 25; Step 10; Density 100; Thickness 100; Rotation 0; Opacity 100; Blend mode normal; Aligned mode checked; Use all layers checked.


STEP 6
Still on the Promoted Selection layer.
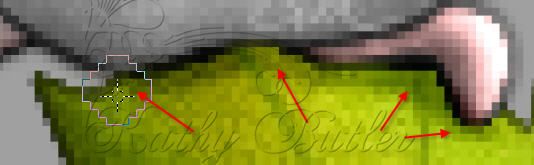
With your clone tool, right click on the leaf where shown in the screenshot below to set what you want to copy.
Left click on the section, just a bit lower, that you want to blend in with the upper portion. Click once in the middle, once to the left and once to the right of the middle. Make any adjustments as needed to suit you.
Once you are happy with the results, Layer; merge down.
Unhide Mouse 1 layer
Save
STEP 7
We are going to give a little bit of a drop shadow to the leaf under the mouse.
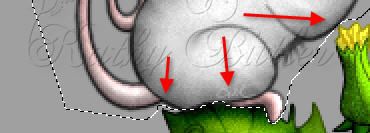
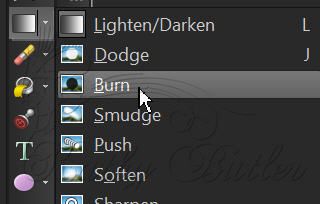
Highlight the Original Layer
Burn tool; Size 5; Hardness 0; Step 10; Density 100; Thickness 100; Rotation 0; Opacity 60
Place your cursor, using the bottom of the mouse as a guide, as in the Screenshot below Move the tool to the left giving the effect of a drop shadow. Make sure you are up under the mouse far enough so when the mouse moves, the shadow will still cover the exposed leaf.
Save
STEP 8
Duplicate the Original Layer. Rename the new layer Original Blowing. Close the Original Layer. Highlight the Original Blowing layer.
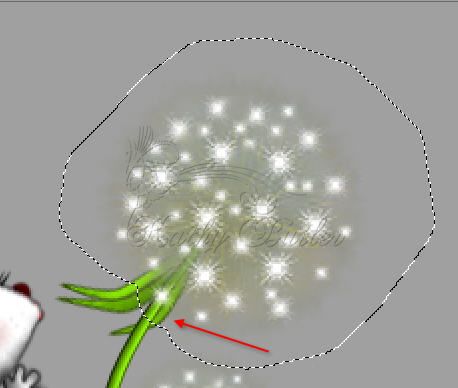
Freehand Selection tool; MODE: Replace; point to point. Feather 5; Anti-alias checked. Select the flower portion of the top flower as shown in the screenshot below.
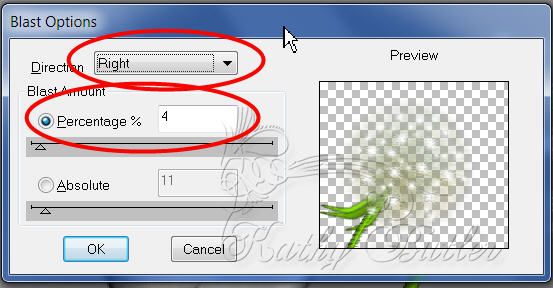
Effects; plugins; dsb flux: Blast ; direction right; Blast Amount; percentage 4%
Deselect
Save
STEP 9
Duplicate the Mouse 1 layer one (1) time. Rename the new layer Mouse 2.
Hide Mouse 1 Layer
Highlight Mouse 2 layer.
Zoom in close to the mouse to see better.
Pick (Deform) tool. 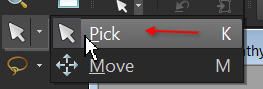
There will be a “bounding” box around the Mouse. Grab the center node at the top and pull up very slightly.
Do not sharpen yet. We will sharpen once only in a later step to keep the edges from distorting.
Save
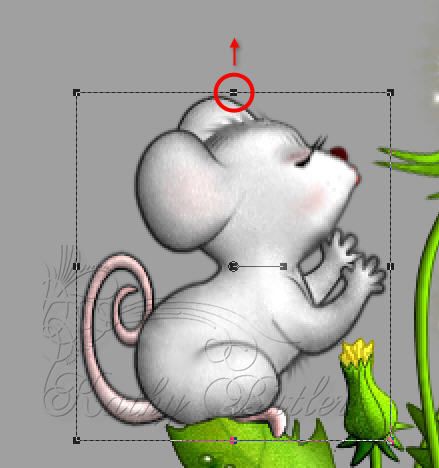
STEP 10
Still on Mouse 2 layer
Warp Brush
Contract (pinch); Size 60; Hardness 25; Strength 82; Steps 25; all other settings can stay at default


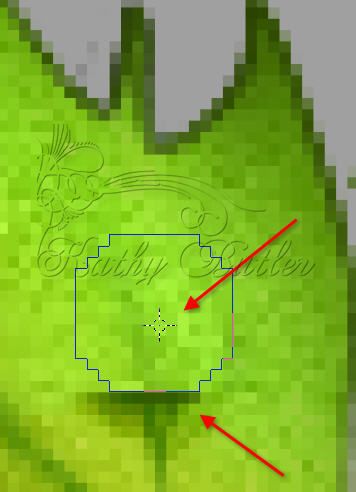
Place your cursor as shown in the Screenshot below.
Click ONE time only. Do not overdo it. Click on the little arrow to accept the change. The change will be very subtle but will show up much more in the actual animation.
Before on left, after on right.
Do not sharpen.
Save
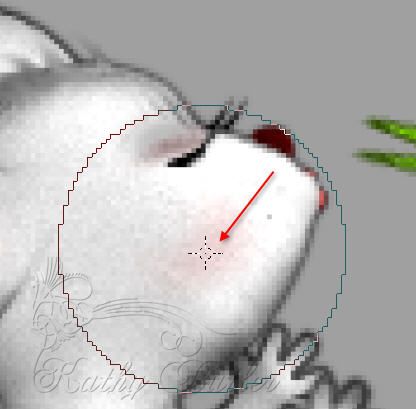
STEP 11
Change the Warp Brush settings:
Expand; Size 75; Hardness 0; Strength 50; Step 25. All other settings can remain the same.

Place your cursor as shown in the screenshots below. Again, click ONE time only. The change should only be slight but noticeable. Click: APPLY
Do not sharpen yet.
Before on left, after on right.
Save
STEP 12
Duplicate the Mouse 2 layer and rename the new layer to Mouse 3
Highlight Mouse 3 Layer
Pick (Deform) tool
Once again, grab the center node at the top center of the bounding box and pull upward very slightly.
Adjust; Sharpness; Unsharp Mask with these settings:
Radius 1, Strength 50; Clipping 5; Luminance only not checked.
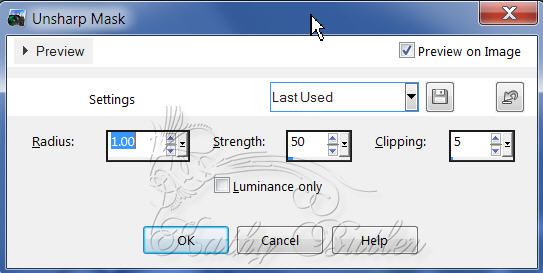
Highlight Mouse 2 layer. Adjust; Sharpness; Unsharp Mask with the same settings.
Save
STEP 13
Highlight the Flower 1 layer and duplicate it two (2) times
Rename the new layers Flower 2 and Flower 3
Open and Highlight Flower 2 layer.
Move tool; CTRL+ right arrow a few times to move the flowers to the right as in screenshot below.
Save
STEP 14
Highlight Flower 3 layer.
Move tool; CTRL+ right arrow a few more times to move the flowers almost off the canvass as shown in the screenshot below.
Save
STEP 15
Hide all layers. Open these layers - IMAGE layer; ORIGINAL Layer; Mouse 2 Layer; top grass layer
Here is my Layer line up for this step.
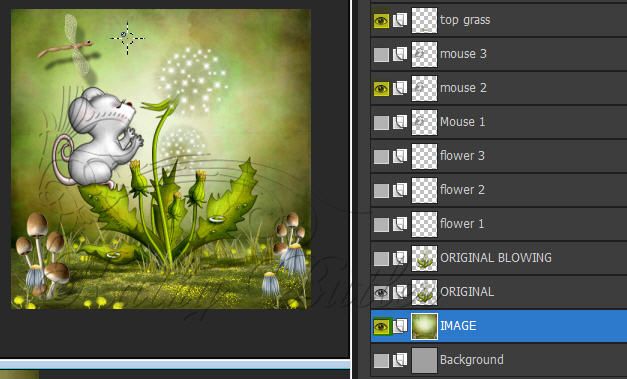
Highlight Top grass Layer
Right click on the top bar of your Image canvas. Choose Copy Merged

Edit; Paste as a New Layer (CTRL + L)
Rename this layer Frame
Effects; plugins; AAA Frames – Photo Frames with these settings:
Width 8; Opacity 100. All the other settings at “0”
Click OK

Save
Still on the Frame Layer.
Selections; Select All; Selections; Contract 9
Hit the Delete key. Deselect
Save
STEP 16
Add your name and appropriate copyright information above the Frame layer. I used the font called Monkey Wishes for my name. Drop Shadow your name with settings of your choice, or
H,V 2, Opacity 60; Blur 7; Color Black #000000
STEP 17
Animating your Image
Open Animation Shop
In PSP
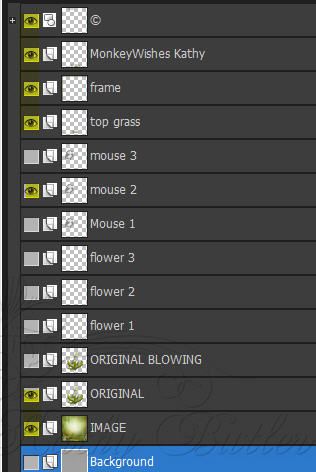
The only layers that should be open are as follows:
Layers from Top to Bottom::
Copyright information Layer
Your name Layer
Frame Layer
Top Grass Layer
Mouse 2 Layer
ORIGINAL Layer
IMAGE Layer
Right click on the top bar of your Image canvas. Copy Merged.
Go to Animation Shop
Edit; Paste; Paste as a New Animation (CTRL+ V) Frame 1
Back to PSP
Hide Mouse 2 Layer
Open Mouse 3 layer
Copy Merged
Back to Animation Shop
Note: For this animation, After Current Frame is always - after the last frame.
Edit; Paste; After Current Frame (Shift+CTRL+L) Frame 2
Back to PSP
Hide Mouse 3 Layer
Hide ORIGINAL Layer
Open ORIGINAL BLOWING LAYER
Open Flower 1 Layer
Open Mouse 1 Layer
Copy Merged
Back to Animation Shop
Edit; Paste; After Current Frame (Shift+CTRL+L) Frame 3
Back to PSP
Hide Flower 1 Layer
Open Flower 2 Layer
Copy Merged
Back to Animation Shop
Edit; Paste; After Current Frame (Shift+CTRL+L) Frame 4
Back to PSP
Hide Flower 2
Open Flower 3
Copy Merged
Back to Animation Shop
Edit; Paste; After Current Frame (Shift+CTRL+L) Frame 5
Back to PSP
Hide Flower 3
Copy Merged
Back to Animation Shop
Edit; Paste: After Current Frame (Shift+CTRL+L) Frame 6
You should now have a total of 6 frames.
Click on Frame 1
Animation; Frame Properties; (Alt + Enter)
Set Frame 1 to the display time of 20
Click on Frame 2
(Alt + Enter) Set Frame 2 to 25
Hold down the CTRL key and click on Frames 3, 4 & 5; (Alt + Enter)
Set Frames 3, 4 & 5 to 15
Click on Frame 6; (Alt+Enter)
Set Frame 6 to 75
File; Save As
Give your animation a name and save as a .MNG type so you always have an original, not optimized version, for future use.
To Optimize your Animation –
The settings I use here are specifically for this image because of the color blends in the background.
If you want further detail, see my Tutorial on Optimizing a GIF Animation with solid Background HERE
File; Optimization Wizard
Check mark in" Animated GIF File" and Check mark in "Create a new animation from the optimized animation" (this keeps the original safe ;).
Click Next
Click on Customize
Under the Colors tab
256 colors
Check mark in Optimized Median Cut
Check mark in Error Diffusion (I generally use Nearest Color here, but because of the type of background in this image, I found Error Diffusion gave a better result)
Under Optimizations Tab
Place check mark in the bottom 3 boxes.
Click OK
Click Next; Next; Finish.
If you are happy with the result, go to:
File; Save As
Give your animation a name and save as a .GIF type file.
On the original .MNG file; Edit; Undo Optimize Animation (CTRL+Z)
Close the .MNG file.
Phew!!!!! All Done :)
I hope you enjoyed doing this tutorial.
Kathy Butler
May 2013
